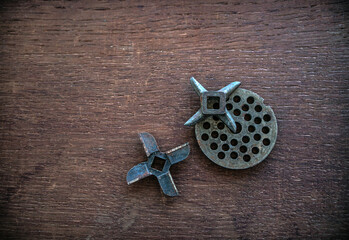
A meat grinder is an invaluable piece of equipment for any restaurant or home kitchen. It is essential for prepping meats and making sausages and burgers. But, like any sharp implement, the blades become dull with time, meaning the quality of the grind is compromised.
To ensure your meat grinder is in tip-top condition, you need to sharpen the blades regularly. In this blog post, we’ll look at the various methods for sharpening meat grinder blades, so you can get the best performance from your grinder.
What Are the Important of Sharpening a Meat Grinder Blades
It is important to sharpen meat grinder blades because dull blades can lead to a number of problems. For one, they can make the grinding process more difficult, resulting in slower production and more physical effort.
However, dull blades can lead to an uneven grind, which can affect the texture and quality of the finished product. Also, dull blades can also cause the meat grinder to wear out more quickly, leading to costly repairs or replacements.
Sharp blades, on the other hand, can make the grinding process much more efficient and effective. They can easily slice through meat and other ingredients, resulting in a smoother and more uniform grind. Sharp blades can also extend the life of the meat grinder by reducing the strain on the machine and reducing the risk of wear and tear.
Tools Needed Sharpen Meat Grinder Blades
To sharpen meat grinder blades, you will need a honing rod or sharpening stone, a bench grinder (optional), and a pair of gloves to protect your hands. You may also need other tools to disassemble and reassemble the meat grinder, such as wrenches or screwdrivers.
How to Disassemble Your Meat Grinder?
Below are step-by-step instructions to help you disassemble your meat grinder.
A step-by-step guide to disassembling your meat grinder:
Step 1: Unplug the meat grinder and remove any remaining meat or ingredients from the hopper.
Step 2: Locate the screws or bolts that hold the meat grinder together. These can often be found on the underside of the hopper or on the sides of the machine.
Step 3: Using a wrench or screwdriver, carefully loosen and remove the screws or bolts.
Step 4: Carefully separate the hopper, grinding plates, and blades from the main body of the meat grinder.
Step 5: If necessary, remove any additional screws or bolts that hold the grinding plates and blades in place.
Step 6: Once all of the parts have been removed, use a soft cloth or brush to clean any excess meat or debris from the blades and other components.
Step 7: Be sure to handle the blades with caution, as they are sharp and can cause injury.
Step 8: Set the disassembled parts aside until you are ready to begin sharpening.
Step 9: When reassembling the meat grinder, be sure to carefully line up the blades and grinding plates, and tighten all screws and bolts securely to ensure that the meat grinder is properly assembled and functioning safely.
Cleaning the blades and other parts
To clean the blades and other parts of your meat grinder, you will need to remove any excess meat or debris from the parts using a dry cloth or brush. If the blades are particularly dirty or have dried on meat or fat, you can use a scraper or blade brush to remove any stuck-on bits.
Once the blades and other parts are clean, rinse them under warm, running water to remove any soap or residue. If the blades are extremely dull or have become damaged, they may need to be replaced. In this case, it is best to refer to the manufacturer’s instructions or seek the help of a professional. Once the blades and other parts are clean and dry, they are ready to be sharpened or reassembled.
Note: It is generally recommended to clean the blades and other parts of the meat grinder with water, as this can help to remove any stuck-on bits and ensure that the parts are thoroughly clean. If you are unable to use water, be sure to remove as much excess meat and debris as possible before sharpening or reassembling the meat grinder.
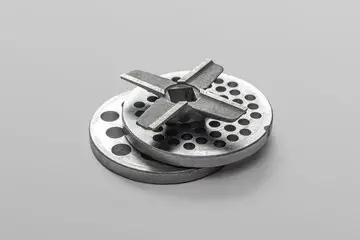
How To Sharpen Meat Grinder Blades
Using a honing rod or sharpening stone:
- Hold the honing rod or sharpening stone at a 20-30 degree angle to the blade.
- Slowly move the honing rod or sharpening stone back and forth across the blade, applying moderate pressure.
- Repeat this process on both sides of the blade until it is sharp.
- If using a sharpening stone, be sure to use fine grit for the final pass to polish the blade.
Using a bench grinder:
- Secure the blade in a vice or clamp to hold it in place.
- Adjust the bench grinder to a medium or fine-grit wheel.
- Hold the blade at a 20-30 degree angle to the wheel.
- Slowly move the blade back and forth across the wheel, applying moderate pressure.
- Repeat this process on both sides of the blade until it is sharp.
Tips for maintaining the proper angle:
- It is important to maintain a consistent angle while sharpening the blade to ensure an even, sharp edge.
- A 20-30 degree angle is generally recommended for most meat grinder blades.
- If you are unsure of the proper angle, refer to the manufacturer’s instructions or seek the help of a professional.
Testing the sharpness of the blades:
- After sharpening the blades, test their sharpness by running a piece of paper or tomato skin along the edge of the blade.
- If the blade easily slices through the paper or tomato skin, it is sharp.
- If the blade does not easily slice through the paper or tomato skin, continue sharpening until it does.
- Once the blades are sharp, they are ready to be reassembled and tested with the meat grinder.
Reassembling the Meat Grinder
To reassemble the meat grinder, you will need to carefully align the blades and grinding plates, making sure that they are properly positioned and not bent or damaged. If necessary, use a wrench or screwdriver to secure the blades and grinding plates in place.
Reattach the hopper and any other parts that were removed during disassembly, and tighten all screws and bolts securely to ensure that the meat grinder is properly assembled and functioning safely.
Once the meat grinder is reassembled, you will need to test it to ensure it is working properly. To do this, simply plug the meat grinder in and turn it on. Slowly feed a small amount of meat through the hopper and into the grinding plate, and observe the meat as it is being ground. Look for any issues such as uneven grinding or difficulty passing through the blades.
If the meat grinder is working properly, the meat should pass through the blades and grinding plate smoothly and evenly. If you notice any problems, stop the meat grinder and check for any loose screws or bolts, or any other issues that may be causing the problem. Once you are satisfied that the meat grinder is working properly, you can proceed with grinding your desired amount of meat.
FAQs
Why is my meat grinder clogging?
There are a few reasons why your meat grinder may be clogged: the meat may be too fatty or sinewy, the grinding plates or blades may be dull, the meat may be too cold, or the meat may be too wet.
What happens if you sharpen a blade too much?
If you sharpen a blade too much, it may become too thin and fragile and may be more prone to breaking or becoming damaged. It is important to only sharpen the blade as much as necessary to achieve a sharp edge, and to avoid oversharpening.
What do you lubricate a meat grinder with?
You can lubricate a meat grinder with a food-grade lubricant, such as a vegetable or mineral oil. It is important to use a food-grade lubricant to avoid contaminating the meat.
Does heating a blade make it sharper?
Heating a blade will not make it sharper. In fact, excessive heat can cause the blade to become brittle and prone to breaking.
How many times can you sharpen a blade?
There is no specific number of times that you can sharpen a blade, as it will depend on the blade’s quality and condition. In general, a high-quality blade that is well-maintained should be able to be sharpened multiple times before it needs to be replaced. However, if the blade is damaged or excessively worn, it may need to be replaced sooner.

Hi, I’m Iolanda I am a mother of two and know how to whip up satisfying dishes for friends and family in a seemingly effortless way. The blog goal is reader-oriented, So We are always looking for the newest information about the best products on the market to offer product reviews and tutorials to assist users.Have Fun on The Website